IN PART 1 of this article series, we talked about stormwater management on the top deck of your site.
Moving downhill, we will next address stormwater on the side slopes of your landfill. If you have properly controlled all the top deck stormwater, there will still be rain that hits the slope and thus needs to be controlled. Most often, this is done by designing and constructing an intermittent series of benches on the landfill slope. These benches, which also provide some slope stability for the landfill, serve the very important role of collecting water that is flowing down the slope before it can accumulate and be concentrated at the level that can cause significant erosion.
Generally, we see benches spaced every 40–50 feet horizontally on the side slopes of landfills. In some cases, where we have a combination of erosive soil and extremely intense rainstorms, some slope erosion may still occur.
Managing municipal solid waste is more than landfilling: publicity, education, engineering, long-term planning, and landfill gas waste-to-energy are specialties needed in today’s complex environment. We’ve created a handy infographic featuring 6 tips to improve landfill management and achieve excellence in operations. 6 Tips for Excellence in Landfill Operations. Download it now!
The best way to minimize erosion on those slopes is to know your soil and know your local weather patterns. If you have erosive soils and intense rainfall events there are a couple of things you can do to minimize slope erosion. First, reduce the spacing between benches. This helps reduce the amount of runoff that accumulates as water runs down the slope. It is usually clearly evident that as stormwater flows down a slope, it becomes more concentrated and the size of rills and overall slope damage increases. Often, you’ll be able to see how far down the slope runoff can travel before the rills become problematic—and you can establish bench spacing accordingly.
Another option is to apply some material to help resist erosion. This can be a manufactured erosion control material such as jute netting, plastic, or some other synthetic or natural-fiber material. Alternatively, slopes can be guarded against erosion by placement of a 6–18-inch layer of processed green waste or wood waste. By the way, this is one of the lowest cost methods of utilizing wood waste or green waste that is processed onsite while keeping it out of the landfill so that it doesn’t take up any airspace. In many climates, this organic mulch will oxidize and decompose and will have to be replaced every 2–4 years. However, it is still a great way to divert material from the landfill and minimize erosion.
In some rare instances, the soil contains enough fist-sized rock that after some slight erosion of fines, the remaining rock will create its own guarding.
Because the benches are intended to intercept stormwater that is sheet-flowing down the slope, it’s important for the benches to have a slight cross slope, usually somewhere between 2% and 5% slope back toward the uphill slope. This ensures that the water that accumulates on those benches does not just flow over the edge and on down the next slope. As that stormwater is carried along those benches, you will need to periodically—wherever you encounter a downdrain—have some means of getting that water into the downdrain. This can be a drop inlet—often constructed of corrugated metal pipe (CMP) or corrugated high-density polyethylene (HDPE).
In addition to having cross-slope, benches must also have some longitudinal slope—the water has to be directed to the right, the left…somewhere. Typically, the longitudinal slope is set somewhere between 1% and 4% depending on several factors.
One factor is that the steeper longitudinal slope will tend to be somewhat more self-cleaning and will maintain a high enough water velocity that it won’t tend to drop out sediment, which could then create a dam and push water over the edge.
But too much slope may increase the water velocity to the point that it will erode the flowline of the bench. You must also design for differential settlement of your landfill. When that happens—and it always will to some degree—you need to have designed in enough longitudinal slope that your bench doesn’t have low points. In our experience, a 1% longitudinal slope is just too flat.
Managing municipal solid waste is more than landfilling: publicity, education, engineering, long-term planning, and landfill gas waste-to-energy are specialties needed in today’s complex environment. We’ve created a handy infographic featuring 6 tips to improve landfill management and achieve excellence in operations.6 Tips for Excellence in Landfill Operations. Download it now!
In order to compensate for the effect of differential settlement, we will generally tend to be at least 2%, and at least preferentially 3% longitudinal slope.
Okay, here we are at the crossroads of engineering theory and practical functionality. We can research, review tables and charts, and talk all day about different types of soils, precipitation patterns, slope, and erosivity at your landfill. Or you can simply walk around the site and see what’s working.
Yep, that’s how we engineers do it. So, if you were upset to learn that Charlie McCarthy couldn’t really talk, then you might also be disappointed to learn that not all engineering is done with a calculator and a formula. Sometimes we just look at what’s working and replicate that. Please note: I am not trying to compare dummies like Charlie McCarthy to engineers like myself, but…well, maybe I should stop while I’m ahead.
Hopefully, at this point you are controlling the top deck water and controlling the water along the slopes by getting it into benches and eventually into downdrains to carry it safely to the toe of the landfill.
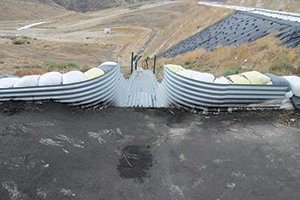
Now you have all that runoff concentrated into a few downdrain outlet points. Great job! But you’re not done yet. In order to minimize excessive erosion at the downdrain outlet, you must provide some means of energy dissipation. In other words, you must control the energy of that water.
This can simply be a T attached to the end of your down drain. Don’t forget that you may need some significant thrust lock or bed of riprap to keep the force of the water from blowing the T off the end of the pipe. Even a partially-full downdrain pipe can put a ton (literally!) of force on that T.
There are several options for energy dissipation, including riprap, a T, a deep pool, and even some big boulders or chunks of concrete. Bottom-line: you need to slow the water so that it can then flow along the perimeter ditch without causing any additional damage.
As that stormwater is traveling through benches and culverts toward sedimentation basins, the trick is to move the water fast enough so that the sediment doesn’t drop off in your ditches and culverts, yet slow enough so it doesn’t cause additional erosion.
This can be a tricky balance to find. You’ll want the ditches to be flat enough to minimize erosion and steep enough to prevent settlement from dropping out. One solution is to maintain the ditches at a reasonably steep slope and then line them with something that will not erode, such as concrete, riprap, or some other synthetic material. Some of the most effective ditches we see are not flat or round-bottomed, but they are instead V-bottomed ditches. These are especially effective at minimizing settlement build up because water—even small amounts of it—is always flowing in the bottom of the ditch and scouring out settlement that would accumulate there.
Once you’ve controlled the water and taken it to the toe of the landfill, there are still a couple of important considerations. You’ll want to be able to carry that water to one or more sedimentation basins or settling ponds. These are essentially ponds that stormwater runoff flows into. This simply allows the stormwater to park—for a while—long enough to allow the sediment to sink to the bottom.
Depending on the type of soil at your facility, that can take anywhere from a few minutes to many days. Obviously coarse, sandy soil will settle out very quickly whereas some clay soils may not settle for days or weeks and may actually require some flocculant for the sediment to drop out.
You should have an engineer who understands soil types and the suspension characteristics of your soils size your sedimentation basin.
If you want to get a quick feel for how rapidly sediment at your landfill will settle out, here is a simple test. Get a clear plastic container with a screw-on lid and put a few handfuls of fine-grained sediment—something that you would find in the bottom of your ditch or perhaps built up at the outlet of some culvert—and dump it into the container. Fill the container about 3/4 full with water, put the lid on, and then shake it vigorously. After it’s all mixed up into a nice muddy color, set it on a shelf, set a timer, and then watch it until the sediment settles out and the water is clear. If there is coarse, sandy material in your soil, those particles will settle out very quickly. However, it’s the fines that we are most concerned about, so you want to track how long it takes that material to settle out—to the point where water is clear enough to see through.
Let’s just suppose for the sake of this example that it takes 20 minutes for that to happen. Your engineer would then design a sedimentation basin to hold 20 minutes of stormwater runoff at the peak runoff event—that is a minimum of 20 minutes, then at that point we’d expect that the bulk of the sediment would have dropped out and what you would be releasing out of your sedimentation basin is clear stormwater.
This is a simplification of what can be a very complicated process, but once you understand the basics of stormwater management, many of the design details will start making sense too.
Latest from Waste Today
- Vecoplan to present modular solutions at IFAT 2026
- Terex Ecotec appoints Bradley Equipment as Texas distributor
- My Green Michigan expands depackaging capacity
- Washington selects Circular Action Alliance as PRO
- Ten-8 Industrial opens new central Florida service center
- Triumvirate Environmental acquires Environmental Waste Minimization
- Official NYC Bin availability expands ahead of deadline
- US Food Waste Pact’s 2025 Impact Report shows decrease in food waste